Restoring a Ford 8N tractor is a rewarding project, but mastering its electrical system is crucial. This guide provides a step-by-step approach to understanding and repairing your 8N's wiring, using wiring diagrams as your roadmap. We'll cover troubleshooting common issues, sourcing parts, and essential tools for a successful restoration. For more information on maintaining your tractor, check out this helpful resource on Ford 8N oil.
Understanding Your Ford 8N's Electrical System
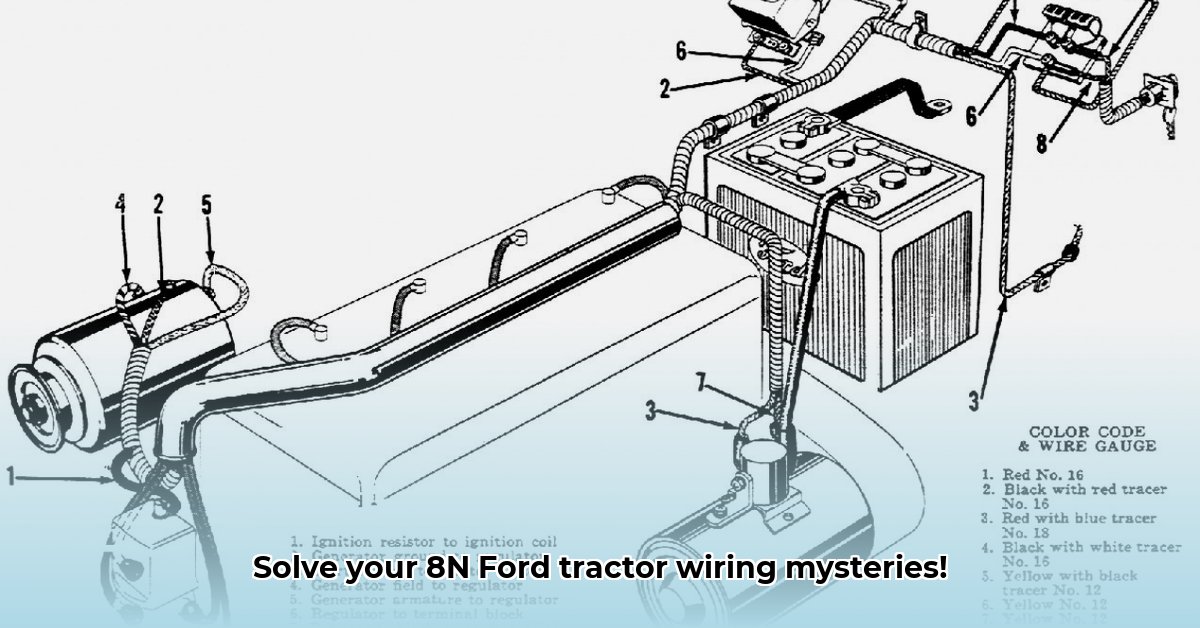
The Ford 8N's electrical system, while seemingly simple, requires careful attention. This section will help you decipher your wiring diagram and lay the groundwork for successful troubleshooting and repairs.
Deciphering the Wiring Diagram: Your Electrical Blueprint
The wiring diagram is your essential guide. It's a visual map showing every wire, connection, and component. Initially, the symbols may seem confusing, but they represent specific parts (e.g., a squiggly line might be a resistor, a circle a light bulb). Familiarize yourself with these symbols. Understanding them is the first step to tracing electrical paths. Think of it like reading a map: following the lines reveals the flow of electricity.
Tracing Electrical Paths: A Step-by-Step Example
Let's trace a simple circuit: the headlights. Locate the headlight symbol on your diagram. Follow the line from the positive (+) battery terminal. This line shows the wire's path, likely to a switch and then to the headlight. This same methodical approach works for all circuits, from the ignition system to the lights and starter. Beginners should start with simpler circuits to gain confidence before tackling more complex systems. Remember, patience and careful attention to detail are key.
Common Wiring Problems and Solutions
Even with a correct diagram, problems occur. Old tractors suffer from age-related electrical issues. This section covers the most frequent problems and their solutions.
Diagnosing Common Electrical Issues
- Loose Connections: Corrosion is a major culprit. Inspect all connections. Clean them with a wire brush and tighten them securely. Replace severely corroded terminals.
- Broken Wires: Inspect the wiring harness for damage. Repair or replace broken sections using appropriate wire splices and connectors.
- Faulty Switches: Test switches with a multimeter to identify faulty ones and replace them.
- Wiring Errors: Previous repairs may contain mistakes. Always compare your wiring to the diagram. Correct any inconsistencies.
- Ground Problems: A weak ground connection disrupts electrical flow. Ensure all ground connections are clean and secure, providing a low-resistance path.
Safety First: Always disconnect the negative (-) battery terminal before working on any electrical components to avoid accidental short circuits.
Essential Tools for Ford 8N Electrical Restoration
The right tools significantly ease the restoration process. This section lists the essential tools needed for effective diagnosis and repair.
Your Wiring Toolkit
| Tool | Purpose | Notes |
|---|---|---|
| Multimeter | Tests voltage, current, and continuity. | Essential for diagnosing electrical issues. |
| Wire Strippers/Cutters | Prepares wires for connections. | Choose good quality tools to avoid damaging wires. |
| Crimpers | Creates secure wire connections. | Several types available; select those suitable for the wire gauge. |
| Soldering Iron (Optional) | Creates more durable connections | Recommended for long-term reliability; requires some experience. |
| Wiring Diagram | Your indispensable guide. | Keep it within easy reach throughout the process. |
| Gloves | Protects your hands. | Safety precaution. |
Troubleshooting Your Ford 8N's Electrical System
This systematic approach aids in diagnosing and resolving electrical problems.
A Step-by-Step Troubleshooting Method
- Identify the Problem: What isn't working? (Headlights? Starter? Ignition?)
- Consult the Diagram: Locate the relevant circuit on the diagram.
- Test Components: Use your multimeter to check voltage and continuity across the component, wires, and connections.
- Inspect Connections: Look for loose, corroded, or broken connections.
Remember: methodical troubleshooting, guided by your wiring diagram, significantly increases your success rate.
Sourcing Hard-to-Find Parts
Finding parts for a classic Ford 8N can prove challenging. This section offers strategies for locating those elusive components.
Locating Ford 8N Parts
Restoring a 1952 Ford 8N requires finding specific parts. Original parts are rare; consider aftermarket or used parts carefully. Use these resources:
- Online Marketplaces: Specialized websites for classic tractor parts.
- Online Forums: Engage with other enthusiasts for advice and part sources.
- Local Dealers/Salvage Yards: Often possess unexpected parts.
- Specialty Part Suppliers: Some companies specialize in hard-to-find parts.
- Online Auction Sites (eBay): Exercise caution; inspect listings carefully.
Remember, always inspect any used part thoroughly and read reviews before purchasing new aftermarket parts.
Key Takeaway: Restoring a Ford 8N's electrical system is achievable with patience, the right tools, and a methodical approach. Use this guide as your reference, and don't hesitate to seek assistance from experienced restorers or online communities. The reward of a functioning classic tractor is well worth the effort.